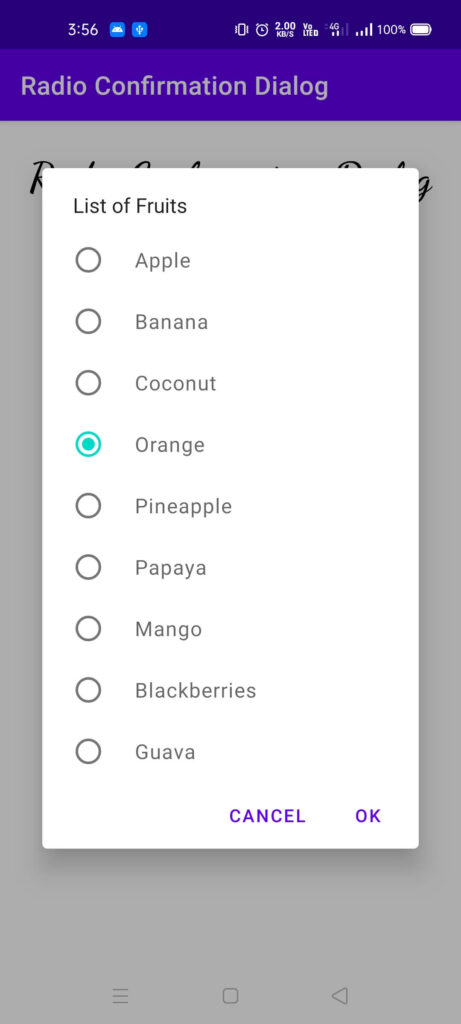
In this post, we’ll be creating an alert dialog with a radio button using Material Design 2.0 in our Android apps with Kotlin.
Let’s Create Alert Dialog With Radio Button
Step 1:
- Open Android Studio.
- Create a new project or go to File- New Project.
- Fill all details to create a new project.
Step 2:
First, you need to add the material components dependency in build.gradle
implementation 'com.google.android.material:material:1.3.0'
Step 3 :
Now open your res/layout/activity_main.xml. file and add the following code.
<?xml version="1.0" encoding="utf-8"?>
<androidx.constraintlayout.widget.ConstraintLayout
xmlns:android="http://schemas.android.com/apk/res/android"
xmlns:app="http://schemas.android.com/apk/res-auto"
xmlns:tools="http://schemas.android.com/tools"
android:layout_width="match_parent"
android:layout_height="match_parent"
tools:context=".MainActivity">
<TextView
android:id="@+id/textView"
android:layout_width="wrap_content"
android:layout_height="wrap_content"
android:layout_marginTop="24dp"
android:fontFamily="cursive"
android:text="Radio Confirmation Dialog"
android:textColor="@color/black"
android:textSize="32sp"
android:textStyle="bold"
app:layout_constraintLeft_toLeftOf="parent"
app:layout_constraintRight_toRightOf="parent"
app:layout_constraintTop_toTopOf="parent" />
<Button
android:id="@+id/btn_showDialog"
android:layout_width="wrap_content"
android:layout_height="wrap_content"
android:layout_marginTop="276dp"
android:text="Radio Confirmation Dialog"
android:textAllCaps="false"
app:layout_constraintLeft_toLeftOf="parent"
app:layout_constraintRight_toRightOf="parent"
app:layout_constraintTop_toBottomOf="@+id/textView" />
</androidx.constraintlayout.widget.ConstraintLayout>
<?xml version="1.0" encoding="utf-8"?> <androidx.constraintlayout.widget.ConstraintLayout xmlns:android="http://schemas.android.com/apk/res/android" xmlns:app="http://schemas.android.com/apk/res-auto" xmlns:tools="http://schemas.android.com/tools" android:layout_width="match_parent" android:layout_height="match_parent" tools:context=".MainActivity"> <TextView android:id="@+id/textView" android:layout_width="wrap_content" android:layout_height="wrap_content" android:layout_marginTop="24dp" android:fontFamily="cursive" android:text="Radio Confirmation Dialog" android:textColor="@color/black" android:textSize="32sp" android:textStyle="bold" app:layout_constraintLeft_toLeftOf="parent" app:layout_constraintRight_toRightOf="parent" app:layout_constraintTop_toTopOf="parent" /> <Button android:id="@+id/btn_showDialog" android:layout_width="wrap_content" android:layout_height="wrap_content" android:layout_marginTop="276dp" android:text="Radio Confirmation Dialog" android:textAllCaps="false" app:layout_constraintLeft_toLeftOf="parent" app:layout_constraintRight_toRightOf="parent" app:layout_constraintTop_toBottomOf="@+id/textView" /> </androidx.constraintlayout.widget.ConstraintLayout>
Step 4:
After adding the XML file, now open your src/MainActivity.kt file and add the following code.
package com.techpassmaster.radioconfirmationdialog
import androidx.appcompat.app.AppCompatActivity
import android.os.Bundle
import android.widget.Button
import android.widget.Toast
import com.google.android.material.dialog.MaterialAlertDialogBuilder
/**
* Created by Techpass Master on 09-May-21.
* www.techpassmaster.com
*/
class MainActivity : AppCompatActivity() {
private lateinit var selectedFruits: String
private var selectedFruitsIndex: Int = 0
private val fruits = arrayOf("Apple", "Banana", "Coconut", "Orange", "Pineapple",
"Papaya", "Mango", "Blackberries", "Guava")
override fun onCreate(savedInstanceState: Bundle?) {
super.onCreate(savedInstanceState)
setContentView(R.layout.activity_main)
val showDialog: Button = findViewById(R.id.btn_showDialog)
// button click listener
showDialog.setOnClickListener {
// call to function
showRadioConfirmationDialog()
}
}
// fun for showing dialog with Radio Button
private fun showRadioConfirmationDialog() {
selectedFruits = fruits[selectedFruitsIndex]
MaterialAlertDialogBuilder(this)
.setTitle("List of Fruits")
.setSingleChoiceItems(fruits, selectedFruitsIndex) { dialog_, which ->
selectedFruitsIndex = which
selectedFruits = fruits[which]
}
.setPositiveButton("Ok") { dialog, which ->
Toast.makeText(this, "$selectedFruits Selected", Toast.LENGTH_SHORT)
.show()
}
.setNegativeButton("Cancel") { dialog, which ->
dialog.dismiss()
}
.show()
}
}
package com.techpassmaster.radioconfirmationdialog import androidx.appcompat.app.AppCompatActivity import android.os.Bundle import android.widget.Button import android.widget.Toast import com.google.android.material.dialog.MaterialAlertDialogBuilder /** * Created by Techpass Master on 09-May-21. * www.techpassmaster.com */ class MainActivity : AppCompatActivity() { private lateinit var selectedFruits: String private var selectedFruitsIndex: Int = 0 private val fruits = arrayOf("Apple", "Banana", "Coconut", "Orange", "Pineapple", "Papaya", "Mango", "Blackberries", "Guava") override fun onCreate(savedInstanceState: Bundle?) { super.onCreate(savedInstanceState) setContentView(R.layout.activity_main) val showDialog: Button = findViewById(R.id.btn_showDialog) // button click listener showDialog.setOnClickListener { // call to function showRadioConfirmationDialog() } } // fun for showing dialog with Radio Button private fun showRadioConfirmationDialog() { selectedFruits = fruits[selectedFruitsIndex] MaterialAlertDialogBuilder(this) .setTitle("List of Fruits") .setSingleChoiceItems(fruits, selectedFruitsIndex) { dialog_, which -> selectedFruitsIndex = which selectedFruits = fruits[which] } .setPositiveButton("Ok") { dialog, which -> Toast.makeText(this, "$selectedFruits Selected", Toast.LENGTH_SHORT) .show() } .setNegativeButton("Cancel") { dialog, which -> dialog.dismiss() } .show() } }
Step 5:
Let’s run and test the application. Connect your Android Mobile device with your computer and click to run from Android Studio. After successfully run your application, your application looks like this.
Read More:
- Android Working With Firebase – Signup And Login Auth.
- Android Interview Questions For Fresher 2021.
- Top 5 Things To Avoid While Developing Android Apps.
I hope you liked the post. If you have any questions regarding this post. Feel free to comment and share the post with your friends.
Happy Learning!!! 😊
hello ,i am in a project and i need a favour from you in making a app .
you can directly contact through my phone number 9330076485