Hi Coders, In this post, we will learn how we can essentially support different screen sizes in Android example, that is a question if you test any app on a tablet and a normal phone the layouts will look differently and If we rotate this phone, so layouts are stacked vertically instead they are stacked horizontally.
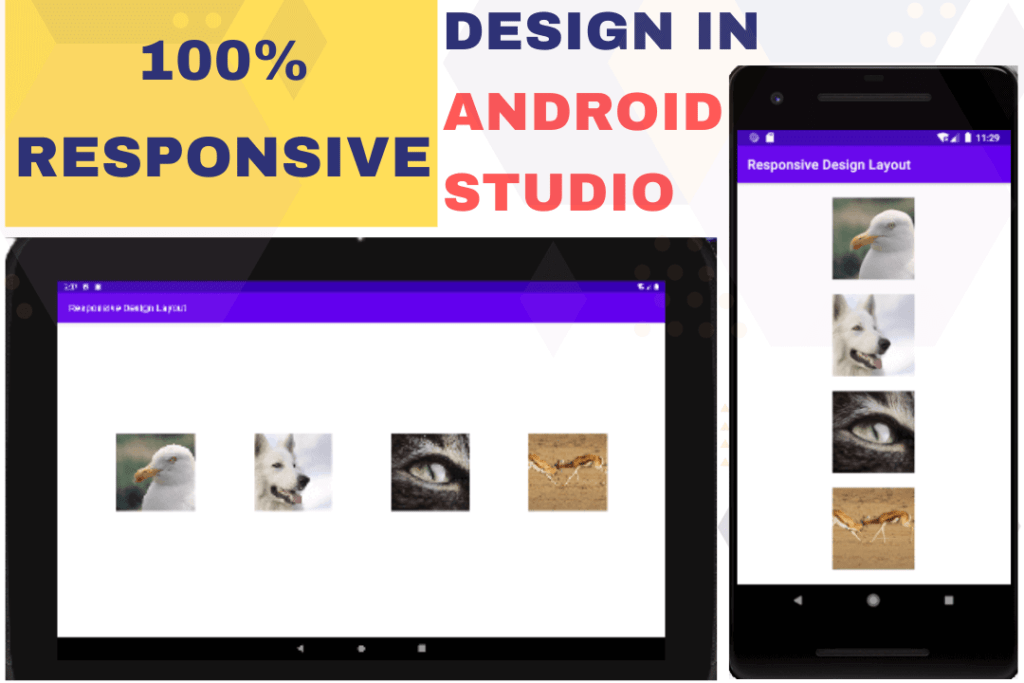
So all those are things, I’ll show you in this post with the help of Constraint Layout, this post is not about how to build a specific layout but with this layout, I can just show you pretty well, which concepts you need to know to support multiple screen sizes or support different Screen Sizes in Android.
Page Contents
Android UI Design: Support different screen sizes in Android with example (A responsive design layout)
• First point:
When it comes to building a responsive design layout so you need to use Constraint Layout if there is only one thing you learned from this post. Always try to use a Constraint Layout, wherever possible and it’s always possible sometimes you need more layouts within a constraint layout but usually you can build your UI just with a single constraint layout. The reason you should use constraint layout there are multiple reasons on the one hand just to have a flat layout hierarchy.
If you use Constraint Layout, so you don’t need to use nested layouts, which will make your app better performance on the other hand in terms of responsiveness constraint layout just comes with a lot of tools that help you to define relative sizes.
• Second point:
You should avoid hard coding and you should also avoid hard-coding of width and height of a view like 100dp or 200dp so on because every device supports different screen sizes. In this post, I’ll show you how all things work, so let’s jump right into the project.
Note: we don’t need any dependencies.
Let’s start building a Responsive layout design
Follow the below steps.
Step 1: Create A Project To Support Different Screen Sizes
- Start a new Android Studio Project.
- Select empty Activity and click Next.
- Project Name: Responsive design layout.
- Choose Language: Kotlin.
- Now click Finish.
- Your project is ready now.
After building the project, you will see your project is ready to start building an app.
Step 2: Create portrait and landscape screen

In the above image, you’ll see all the different layouts created with different screen sizes. Now we’ll start to create the portrait and landscape screens for the multiple screens, below are the steps you can follow these steps, step by step.
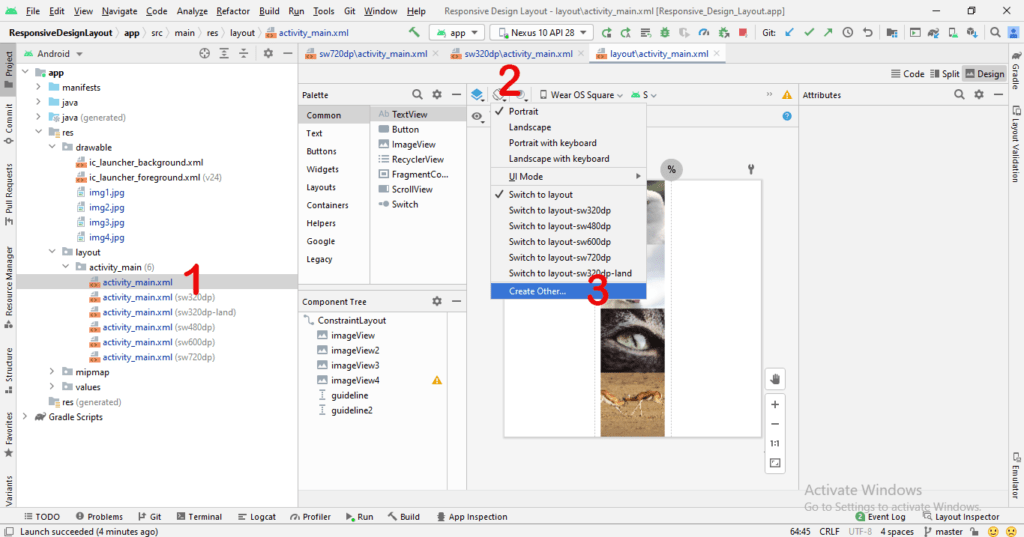
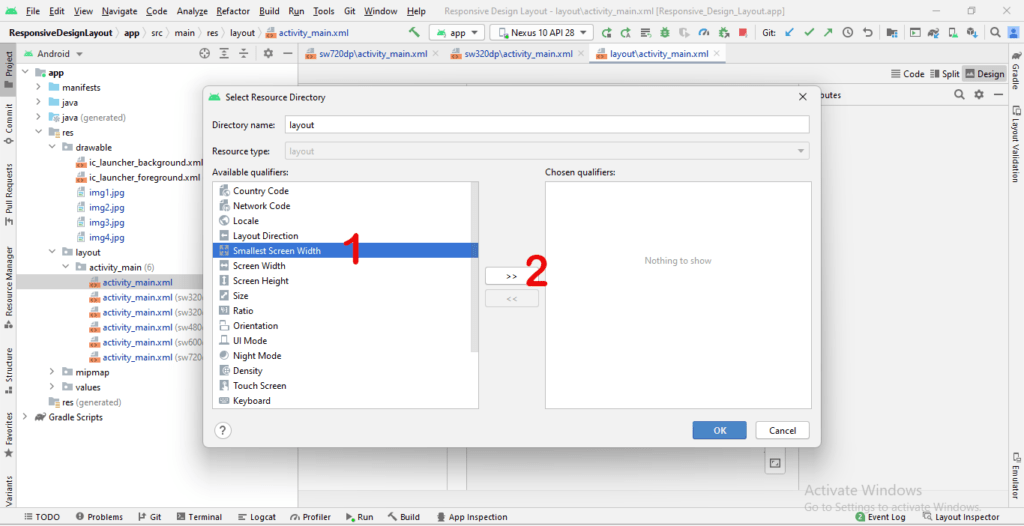
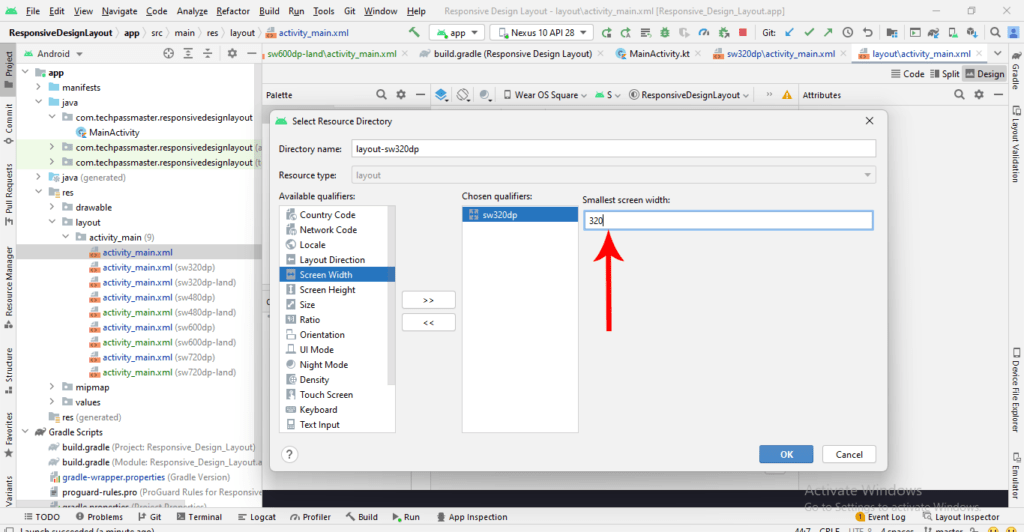
Now, we’ll create screens for the landscape layout.
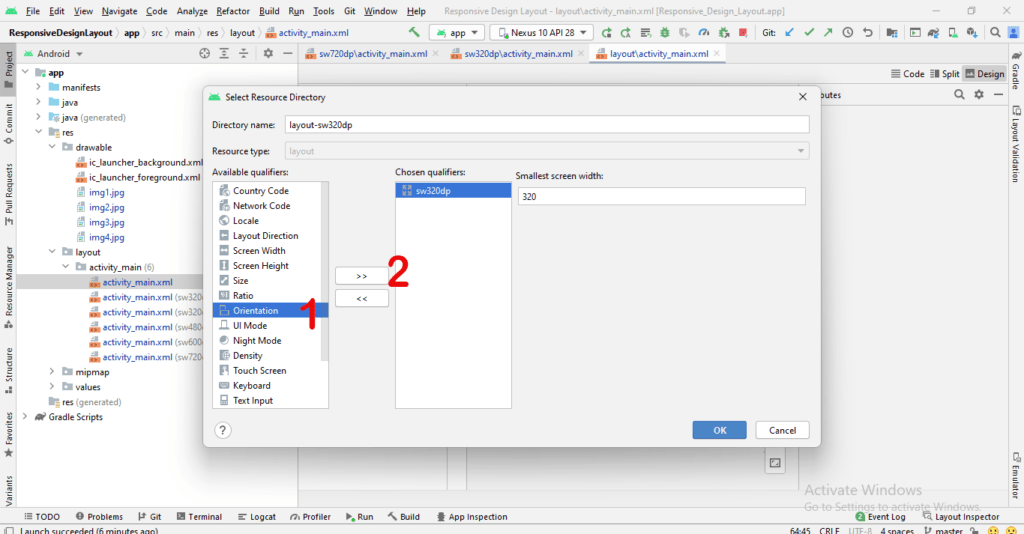
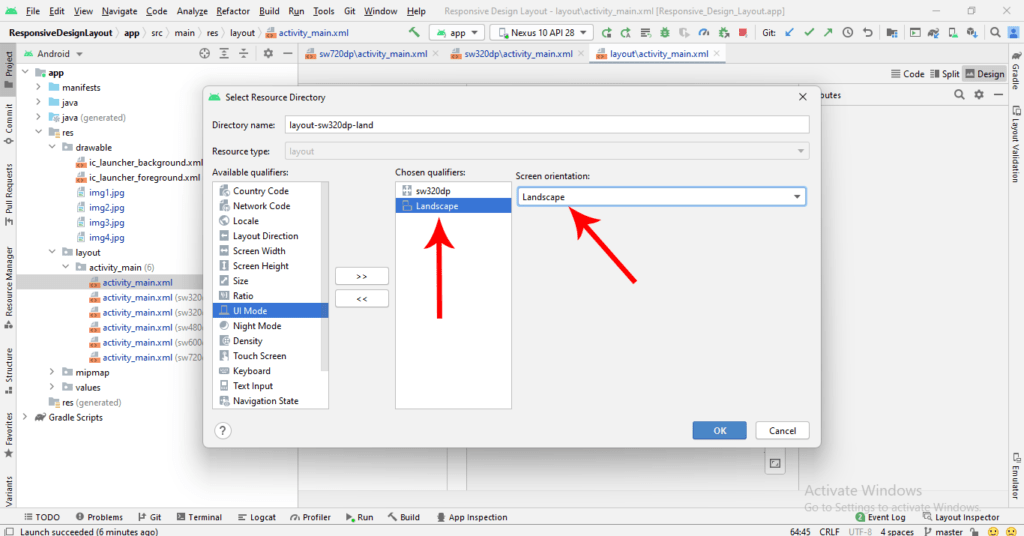
If you follow the above steps, you’ll be able to create all screen type sizes. Now we’re going to start to design the responsive design by using the below code.
Step 3: Open Main XML Layout to create a portrait layout
Now go to the res folder and open activity_main.xml and paste the below code. The below code is responsible for creating the portrait layout.
- activity_main.xml (sw320dp)
- activity_main.xml (sw480dp)
- activity_main.xml (sw600dp)
- activity_main.xml (sw720dp)
<?xml version="1.0" encoding="utf-8"?>
<androidx.constraintlayout.widget.ConstraintLayout xmlns:android="http://schemas.android.com/apk/res/android"
    xmlns:app="http://schemas.android.com/apk/res-auto"
    xmlns:tools="http://schemas.android.com/tools"
    android:layout_width="match_parent"
    android:layout_height="match_parent"
    tools:context=".MainActivity">

    <ImageView
        android:id="@+id/imageView"
        android:layout_width="0dp"
        android:layout_height="0dp"
        android:scaleType="centerCrop"
        app:layout_constraintBottom_toTopOf="@+id/imageView2"
        app:layout_constraintDimensionRatio="1:1"
        app:layout_constraintEnd_toEndOf="@id/guideline2"
        app:layout_constraintHorizontal_bias="0.5"
        app:layout_constraintStart_toStartOf="@id/guideline"
        app:layout_constraintTop_toTopOf="parent"
        app:srcCompat="@drawable/img1" />

    <ImageView
        android:id="@+id/imageView2"
        android:layout_width="0dp"
        android:layout_height="0dp"
        android:scaleType="centerCrop"
        app:layout_constraintBottom_toTopOf="@+id/imageView3"
        app:layout_constraintDimensionRatio="1:1"
        app:layout_constraintEnd_toEndOf="@id/guideline2"
        app:layout_constraintHorizontal_bias="0.5"
        app:layout_constraintStart_toStartOf="@id/guideline"
        app:layout_constraintTop_toBottomOf="@+id/imageView"
        app:srcCompat="@drawable/img2" />

    <ImageView
        android:id="@+id/imageView3"
        android:layout_width="0dp"
        android:layout_height="0dp"
        android:scaleType="centerCrop"
        app:layout_constraintBottom_toTopOf="@+id/imageView4"
        app:layout_constraintDimensionRatio="1:1"
        app:layout_constraintEnd_toEndOf="@id/guideline2"
        app:layout_constraintHorizontal_bias="0.5"
        app:layout_constraintStart_toStartOf="@id/guideline"
        app:layout_constraintTop_toBottomOf="@+id/imageView2"
        app:srcCompat="@drawable/img3" />

    <ImageView
        android:id="@+id/imageView4"
        android:layout_width="0dp"
        android:layout_height="0dp"
        android:scaleType="centerCrop"
        app:layout_constraintBottom_toBottomOf="parent"
        app:layout_constraintDimensionRatio="1:1"
        app:layout_constraintEnd_toEndOf="@id/guideline2"
        app:layout_constraintHorizontal_bias="0.5"
        app:layout_constraintStart_toStartOf="@id/guideline"
        app:layout_constraintTop_toBottomOf="@+id/imageView3"
        app:srcCompat="@drawable/img4" />

    <androidx.constraintlayout.widget.Guideline
        android:id="@+id/guideline"
        android:layout_width="wrap_content"
        android:layout_height="wrap_content"
        android:orientation="vertical"
        app:layout_constraintGuide_percent="0.35" />

    <androidx.constraintlayout.widget.Guideline
        android:id="@+id/guideline2"
        android:layout_width="wrap_content"
        android:layout_height="wrap_content"
        android:orientation="vertical"
        app:layout_constraintGuide_percent="0.65" />

</androidx.constraintlayout.widget.ConstraintLayout>
Step 4: Open Main XML Layout to create a landscape layout
Again go to res folder and open activity_main.xml and paste the below code. The below code is responsible for creating the landscape layout.
- activity_main.xml (sw320dp-land)
- activity_main.xml (sw480dp-land)
- activity_main.xml (sw600dp-land)
- activity_main.xml (sw720dp-land)
<?xml version="1.0" encoding="utf-8"?>
<androidx.constraintlayout.widget.ConstraintLayout xmlns:android="http://schemas.android.com/apk/res/android"
    xmlns:app="http://schemas.android.com/apk/res-auto"
    xmlns:tools="http://schemas.android.com/tools"
    android:layout_width="match_parent"
    android:layout_height="match_parent"
    tools:context=".MainActivity">

    <ImageView
        android:id="@+id/imageView"
        android:layout_width="0dp"
        android:layout_height="0dp"
        android:scaleType="centerCrop"
        app:layout_constraintBottom_toTopOf="@+id/guideline2"
        app:layout_constraintDimensionRatio="1:1"
        app:layout_constraintEnd_toStartOf="@+id/imageView2"
        app:layout_constraintStart_toStartOf="parent"
        app:layout_constraintTop_toTopOf="@+id/guideline"
        app:srcCompat="@drawable/img1" />

    <ImageView
        android:id="@+id/imageView2"
        android:layout_width="0dp"
        android:layout_height="0dp"
        android:scaleType="centerCrop"
        app:layout_constraintBottom_toTopOf="@+id/guideline2"
        app:layout_constraintDimensionRatio="1:1"
        app:layout_constraintEnd_toStartOf="@+id/imageView3"
        app:layout_constraintHorizontal_bias="0.5"
        app:layout_constraintStart_toEndOf="@+id/imageView"
        app:layout_constraintTop_toTopOf="@+id/guideline"
        app:srcCompat="@drawable/img2" />

    <ImageView
        android:id="@+id/imageView3"
        android:layout_width="0dp"
        android:layout_height="0dp"
        android:scaleType="centerCrop"
        app:layout_constraintBottom_toTopOf="@+id/guideline2"
        app:layout_constraintDimensionRatio="1:1"
        app:layout_constraintEnd_toStartOf="@+id/imageView4"
        app:layout_constraintHorizontal_bias="0.5"
        app:layout_constraintStart_toEndOf="@+id/imageView2"
        app:layout_constraintTop_toTopOf="@+id/guideline"
        app:srcCompat="@drawable/img3" />

    <ImageView
        android:id="@+id/imageView4"
        android:layout_width="0dp"
        android:layout_height="0dp"
        android:scaleType="centerCrop"
        app:layout_constraintBottom_toTopOf="@+id/guideline2"
        app:layout_constraintDimensionRatio="1:1"
        app:layout_constraintEnd_toEndOf="parent"
        app:layout_constraintStart_toEndOf="@+id/imageView3"
        app:layout_constraintTop_toTopOf="@+id/guideline"
        app:srcCompat="@drawable/img4" />

    <androidx.constraintlayout.widget.Guideline
        android:id="@+id/guideline"
        android:layout_width="wrap_content"
        android:layout_height="wrap_content"
        android:orientation="horizontal"
        app:layout_constraintGuide_percent="0.35" />

    <androidx.constraintlayout.widget.Guideline
        android:id="@+id/guideline2"
        android:layout_width="wrap_content"
        android:layout_height="wrap_content"
        android:orientation="horizontal"
        app:layout_constraintGuide_percent="0.60" />

</androidx.constraintlayout.widget.ConstraintLayout>
Congratulations, all steps are done, now let’s run and test the application.
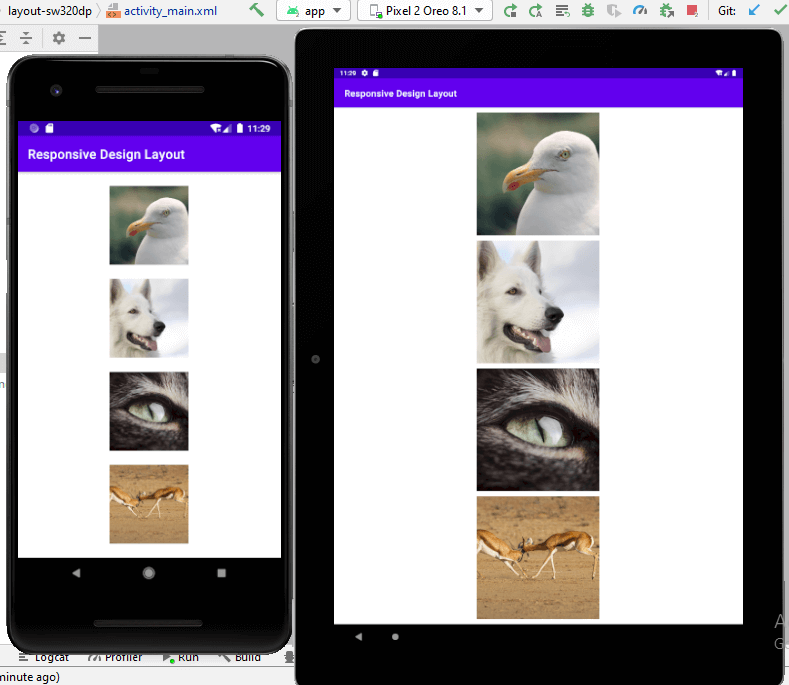
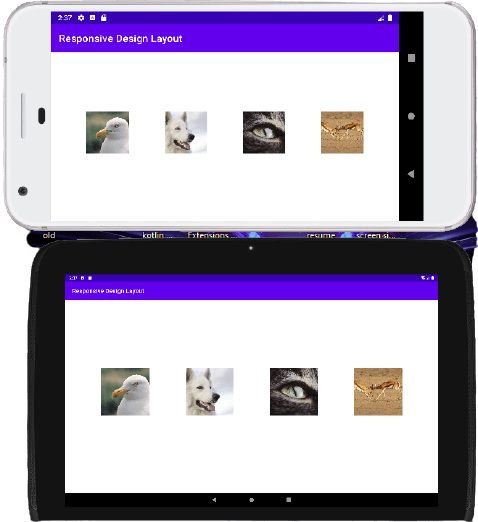
You May Also Like:
- Kotlin tutorial for beginners.
- Kotlin Android Math App In Android Studio.
- How To Make An Android App For Beginners
- Android Interview Questions For Fresher.
- Install & Setup Android Studio Java JDK & SDK.
- Shimmer Effect Android Using Kotlin.
Feel free to comment and share the post with other developers. Happy Learning 🙂
