Hey guys, welcome back to Techpass Master, today I will tell you guys how to make bootable USB Windows 10. We’ll be installing a totally functional copy of Windows 10 onto a USB flash drive or external disk drive, and you will be ready to plug this drive into any computer, and you will be ready to boot into Windows from it and this will work on Windows 7, 8, 8.1, and in fact Windows 10.
So, this will work on a USB flash drive or an external hard drive the drive just needs to be 16 gigabytes or above, however, I completely recommend doing this on an external disk drive over a USB flash drive because an external disk drive has better read and write speeds to stay up with the OS disk drives are literally designed you recognize to front OS however a USB flash drive is a sort of slow and definitely struggles to run an operating system.
I find half the time that I do that and that I tried else into Windows off a USB flash drive, but I can not even get into the window’s step found out screen, so whenever, I’ve done this on an external hard drive it’s worked flawlessly. I’d also recommend having a USB 2.0 drive over a USB 2.0 drive because the brainy write speeds on USB 3.0 are quite a bit faster.
If you are going to be booting Windows 7 off of your drive it does get to be USB 2.0 since Windows 7 doesn’t actually support booting off of USB 3, so I feel that’s everything I wanted to say within the introduction here let’s go ahead and get into the post.
Page Contents
How To Make Bootable USB Windows 10
Step 1: download & Installation media creation tool
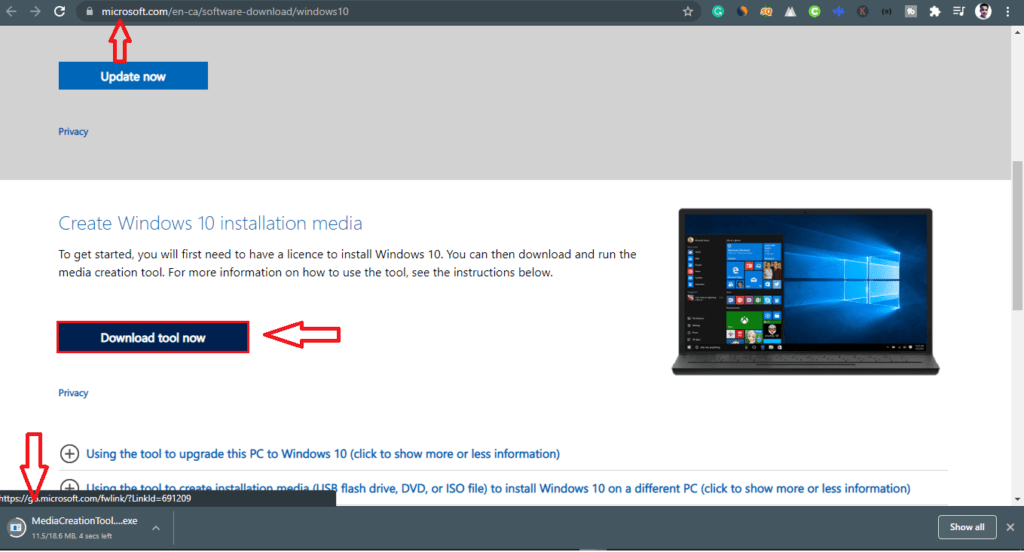
We’re going to need to get an image file or an ISO file of the Windows version because we will be putting it onto our USB, we’ll download the ISO file from the Microsoft website. So you’re just going to need to download the Windows 10 installation media creation tool.
Step 2: license agreement & installation media
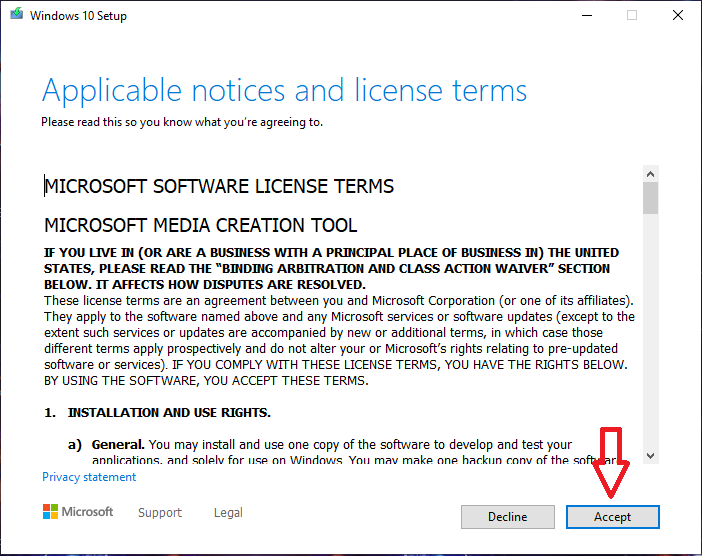
Once, it’s done downloading, just double-click on it to open it, now simply accept the license agreement.
Now, it asks us what we want to do, so here we select create installation media, we don’t want to upgrade this pc.
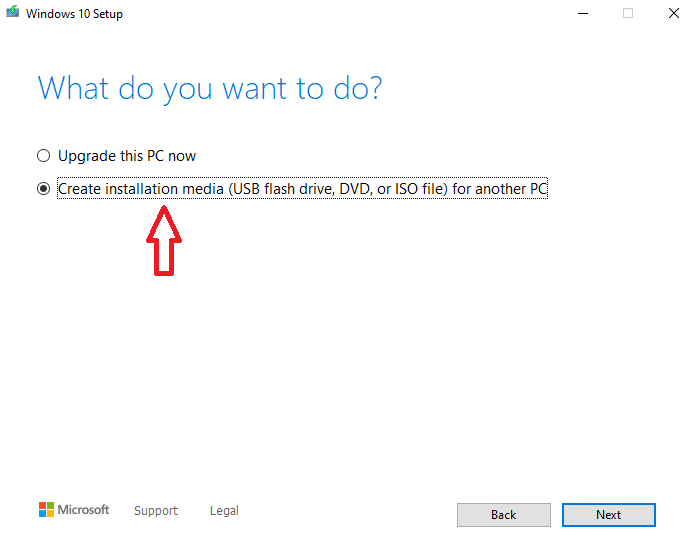
Make sure that a great installation media USB flash drive DVD ISO file for another pc is checked. Now click Next and choose the version of Windows that you want to download.
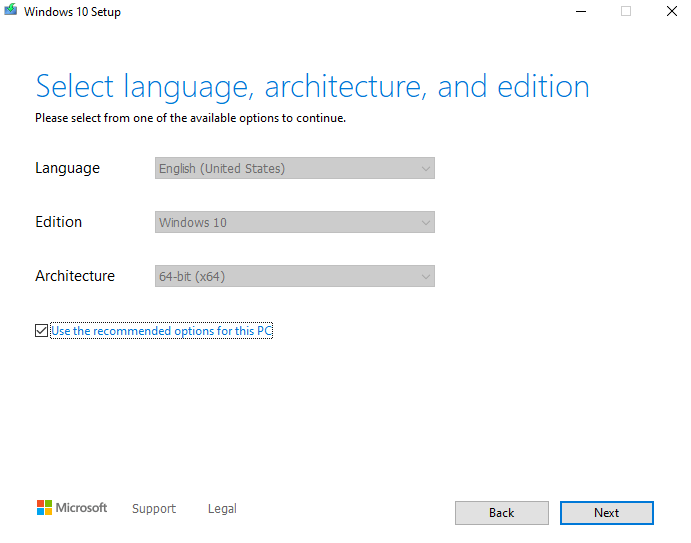
If you have this check that’s going to use the recommended option for this PC, but you can uncheck that if you want to change the language & Edition, you’re you only have one option which is Windows 10 and architecture you’re going to want to keep that at 64-bit and then clicks Next and confirms.
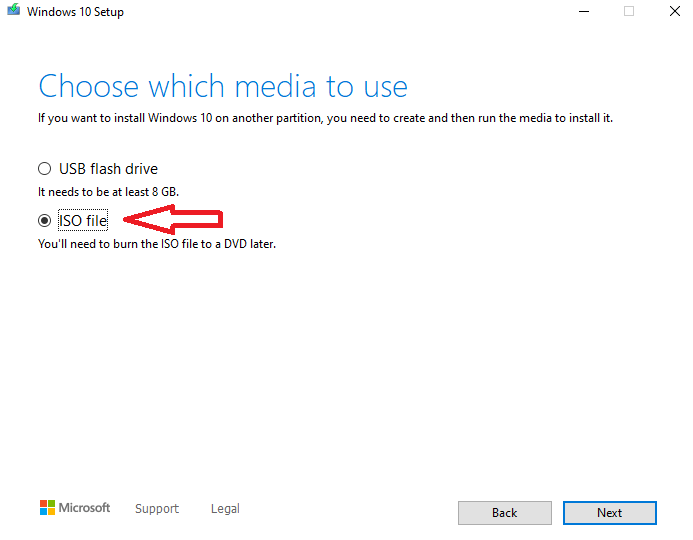
Step 3: Choose Media for windows 10
Select ISO file and click Next.
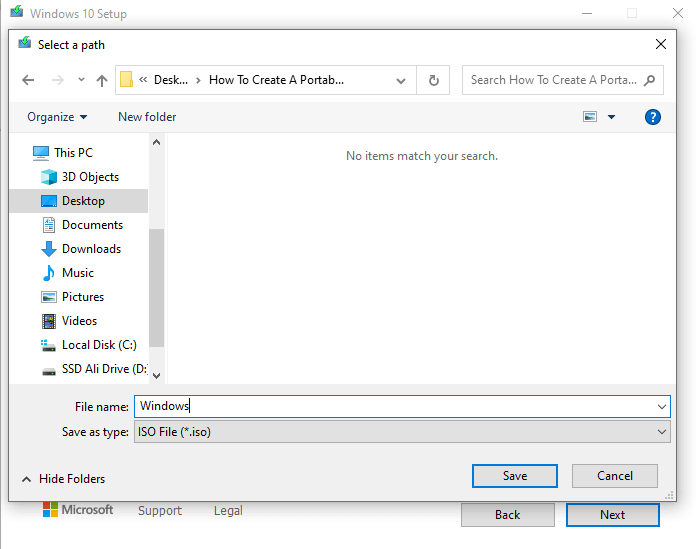
Step 4: Select the file download location
Now, Select the file download location, where you want to download the file onto your computer, then click Save.
It’s going to start a download for our windows ISO file, so this is probably taking quite a bit of time this will depend on the speed of your internet after image file download, so go ahead and click finish.
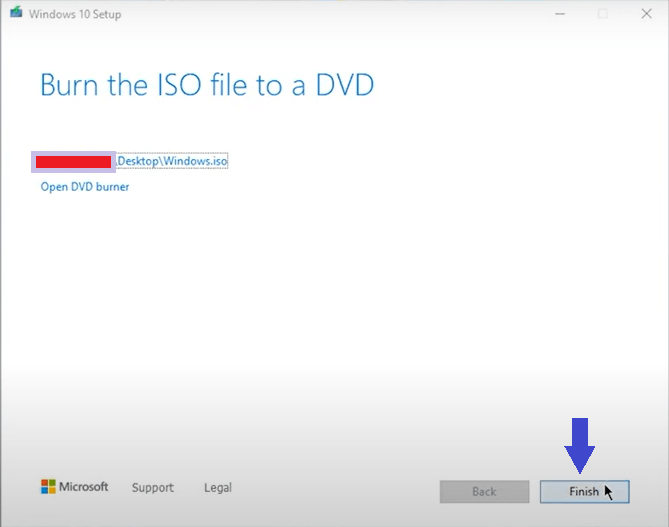
You can see that we have our windows ISO file, so the next thing we’re going ahead and plug in our USB flash drive or external hard drive.
So, once you’ve done that you’re going to want to head over to this PC, and you’re just going to backup and format your drive because we’re gonna, lose any data that’s on the drive and then right-click on it and then go to formats and go into the format your USB stick or external hard drive, all right so once you’ve done that, we can close out of this PC.
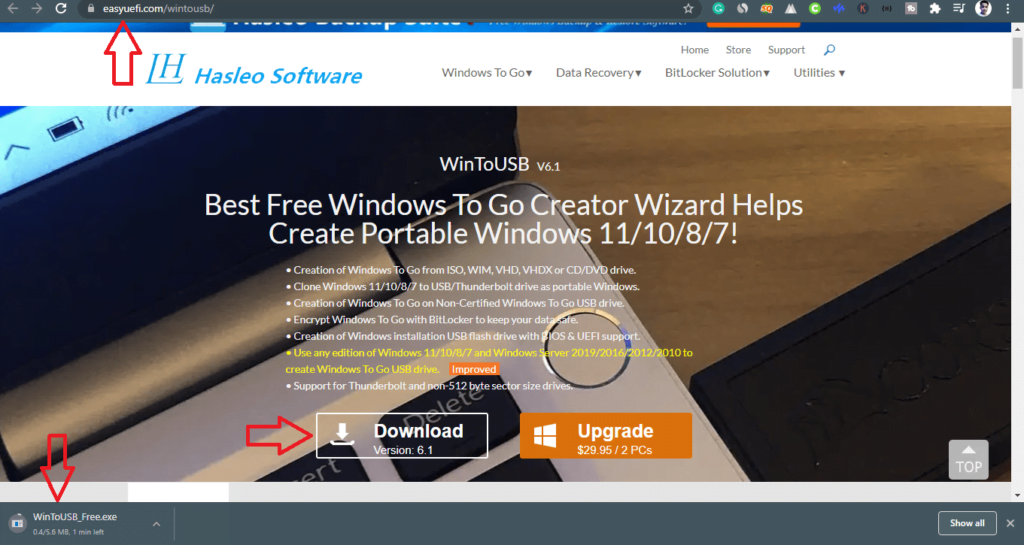
Step 5: download Win to USB windows 10
Now open the internet browser and search Win to USB, this is the second software we’re going to want to download and install to create our portable USB stick, so you’re going to want to download the free version here there is a paid version, the free version will work fine. So go ahead and click on download and save it. I’ll save it on my desktop.
So, once it’s done downloading, just open it to install. It pretty much installs like any other program so just choose your language to accept the License Agreement hit next, next, next…and install.
Step 6: Select Image File & Operating System
Once, it’s done click to finish, you’ll be presented with something that looks like this so under you’re going to want to make sure that the disk icon is selected here, and we’re gonna want to select an image file and this is the image file we downloaded earlier.
Just navigate to where you downloaded it and then open it, here of the different versions of Windows 10 that you can install however on the free version of went USB.
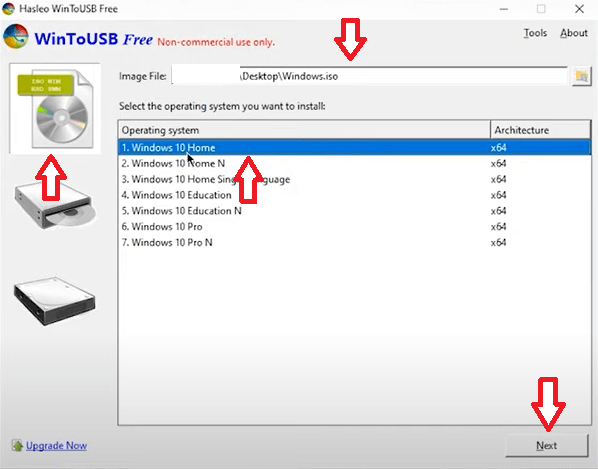
You can only install Windows 10 Home if you try to download Windows 10 Pro that’s going to give us an error saying we need to buy the full version anyway, just choose Windows 10 Home then click on next.
Step 7: Create portable USB windows 10
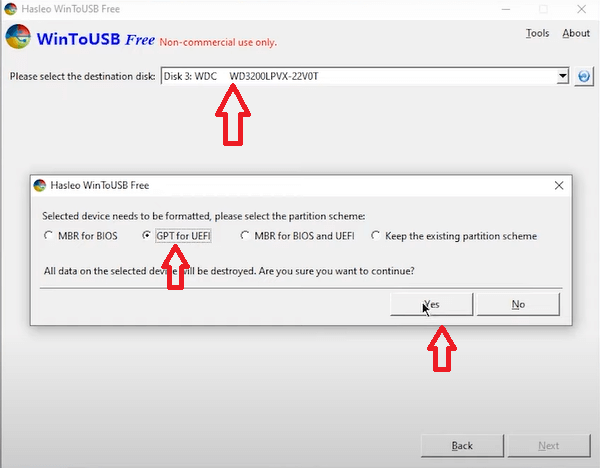
So here we’re gonna choose the drive we want to make our portable USB so make sure you choose the right one because it will be formatted again so this one is just another external hard drive that we plugged into the computer this is the one we want to create portable USB.
Now, it’s gonna ask you to choose a partition scheme here so this depends on which computer you’re gonna really be using your portable USB on so most newer computers that were made after 2011 use a GPT for UEFI which have a key with a newer style UEFI BIOS a lot of older computers use MBR for BIOS the computers that I’m gonna be using this on they’re generally newer computers and use the Huey f5 BIOS.
So, I’m going to choose this one, I mentioned for newer computers made after 2011 you’re probably gonna want to choose this one ultra computers probably choose this one so I’m going to choose GPT once again then click on yes.
Step 8: installation Windows onto your portable USB
Now, it’s going to format our drive again this might take a few minutes, so once that’s finished, make sure that these both are checked under installation mode to keep it as legacy and also to make sure that the full size of your disk is listed here. Now go ahead and click on next and this is going to start the installation of your Windows onto your portable USB.
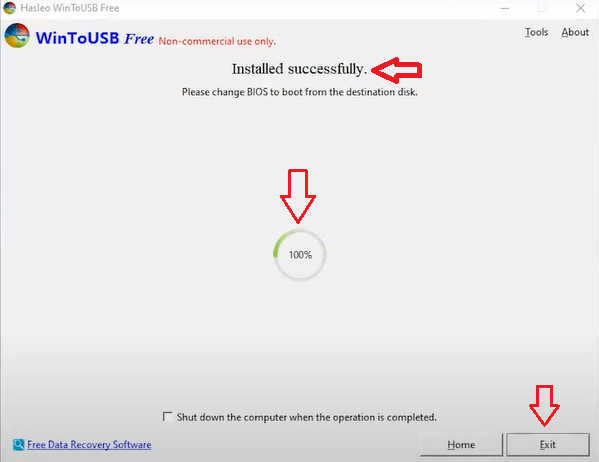
It’s depending on what you like whatever driver using so for example if you’re using an external hard drive this usually takes about 10 to 15 minutes however if you’re using a USB stick I find this can take a very long time like over an hour and a half, so be patient also if it gets stuck at 0% here I don’t worry I find that a lot of time it will stay at 0% for quite a long time but then after a bit of time it will start to kill.
The install has finished just go ahead and click on its exit and eject our USB or hard drive so. now we can go ahead and unplug our hard drive or USB stick plug it into any computer and boot into Windows from it. So let’s go ahead and try that out so now go ahead and plug in your USB or external hard drive into any computer.
Step 9: Boot Windows 10 into any Computer
Now, go ahead and turn your computer and you’re gonna need to boot into the BIOS in my case, I just have to press the f2 key, and that’s going to bring me into the BIOS there’s a different key for every computer to get into the BIOS most commonly it’s f2 do we escape or f12 so once you find out the key to boot into your BIOS.
It right after turning your computer on and it’s gonna boot into the BIOS it’s might be a little bit different but the concept here it’s pretty much the same.
Step 10: Boot Windows 10 from USB
We need to make sure that our computer will boot from our USB rather than our main hard disk or SSD so I’m going to do my case is move over to the boot tab then gonna make sure that the USB is in the first position in the boot priority which in this post or in this case it already is but if it wasn’t we would use f5 or f6 key to move it up or down in the list.
Once you’ve done that just go over to the exit tab go down to exit and save and then press ENTER and then your computer is going to restart and boot to the USB stick or external hard drive.
So, now our computer is booting into Windows that is running off our portable drive as I mentioned at the beginning of the post this might take quite a bit of time depending on the speed of your drive, it’ll also take quite a bit of time because this is the first time we are booting into Windows off of this drive so you know it just needs to copy over quite a bit of setup files.
Step 11: Setup new Windows 10
Windows setup pretty much to set this up like any new Windows computer, enter your Microsoft account and create a passcode connect to a network and disable all the things.
Now, we’ve successfully installed a full copy of Windows 10 onto a portable USB, so you can use this copy of Windows like normal and solve programs browse the web, and then you can unplug this USB from your computer plug it into a new computer.
Your installation of Windows will be exactly the same you might see your screen flicker a few times that’s just windows installing, if you were to plug this drive into another computer Windows 10 does a very good job of detecting new hardware and it will actually go ahead and install new drivers for them automatically so that’s it for this post.
Recommended Reading: