Jetpack Compose is a user interface (UI) toolkit for Android apps that makes building interfaces easier. Think of a TextField as a box where users can type things in Jetpack Compose.
It helps manage what’s written and makes it simple for developers to create text boxes that users can interact with. Jetpack Compose makes building Android apps more modern and efficient, especially when designing how users input with TextField and see text on the screen.
Page Contents
TextField or EditText in Compose
Step-by-Step Implementation
Step 1: Create a New Project in Android Studio
To create a new project in Android Studio, Select Empty Compose Activity. If you do not find this template, try upgrading the Android Studio to the latest version and make sure you select Kotlin as the primary language while creating a New Project.
Step 2: Working with the TextFieldActivity.kt file
Go to the TextFieldActivity.kt file and refer to the following code. Below is the code for the TextFieldActivity.kt file.
In this example:
- rememberTextFieldState is used to retain the state of the text field.
- TextField is the composable responsible for rendering the text input field.
- value is used to bind the text of the field to the value stored in textFieldState.
- onValueChange is a callback that gets called when the user changes the text, allowing you to handle and update the text appropriately.
- label provides a hint or label for the text field.
- keyboardOptions It’s like choosing how your keyboard behaves when you type. For example, whether it should show letters, numbers, or emojis.
- textStyle This is about how your text looks. You can decide on things like the font (style of letters), the size of the text, its color, and more.
- maxLines Think of it as setting a limit on how many lines of text can fit in a box.
- singleLine This is a setting that you can use with a TextField to make sure users can only input text on a single line. It’s like having a one-line text box, such as a username or a password.
package com.codepassmaster.jetpackcomposeseries

import android.os.Bundle
import androidx.activity.ComponentActivity
import androidx.activity.compose.setContent
import androidx.compose.foundation.layout.*
import androidx.compose.foundation.text.KeyboardOptions
import androidx.compose.material3.MaterialTheme
import androidx.compose.material3.Surface
import androidx.compose.material3.Text
import androidx.compose.material3.TextField
import androidx.compose.runtime.*
import androidx.compose.ui.Alignment
import androidx.compose.ui.Modifier
import androidx.compose.ui.graphics.Color
import androidx.compose.ui.text.TextStyle
import androidx.compose.ui.text.input.KeyboardCapitalization
import androidx.compose.ui.text.input.KeyboardType
import androidx.compose.ui.unit.dp
import com.codepassmaster.jetpackcomposeseries.ui.theme.JetpackComposeSeriesTheme

class TextFieldActivity : ComponentActivity() {

    override fun onCreate(savedInstanceState: Bundle?) {
        super.onCreate(savedInstanceState)
        setContent {
            JetpackComposeSeriesTheme {
                Surface(color = MaterialTheme.colorScheme.background) {

                    TextFieldCompose()
                }
            }
        }
    }
}

@Composable
fun TextFieldCompose(){
//    - value
//    - onValueChange
//    - placeholder
//    - keyboardOptions
//    - textStyle
//    - maxLines
//    - singleLine

    var text  by remember { mutableStateOf("") }

    Column(
        modifier = Modifier
            .fillMaxWidth()
            .fillMaxHeight(),
        verticalArrangement = Arrangement.Center,
        horizontalAlignment = Alignment.CenterHorizontally
    ) {

        TextField(
            value = text,
            onValueChange = {
                text = it
            },
            textStyle = TextStyle(color = Color.Blue),
            keyboardOptions = KeyboardOptions(
                capitalization = KeyboardCapitalization.Characters,
                autoCorrect = true,
                keyboardType = KeyboardType.Text
            ),
            placeholder = {
                Text("Enter Name")
            },
            singleLine = true,
            maxLines = 4
        )

        Spacer(modifier = Modifier.height(20.dp))

        TextField(
            value = "",
            onValueChange = {
                text = ""
            },
            textStyle = TextStyle(color = Color.Blue),
            keyboardOptions = KeyboardOptions(
                capitalization = KeyboardCapitalization.Characters,
                autoCorrect = true,
                keyboardType = KeyboardType.Text
            ),
            placeholder = {
                Text("Enter Email Id")
            },
            singleLine = true,
            maxLines = 4
        )
    }
}
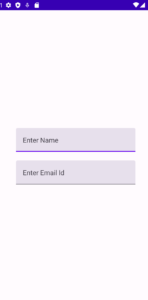
Now run your application to see the output of it.
Output:

This is a basic example, and you can customize the TextField further based on your requirements.
You May Also Like ⇣
- Text in Jetpack Compose
- Clickable Text in Jetpack Compose
- Underline Text in Jetpack Compose
- Bold Italic Underline in Jetpack Compose
- ListView in Jetpack Compose using Android Studio
