Hello, future developer welcomes to the Techpass Master website this post is about How to make an android app for beginners. In this post, we will be going to build a Simple Calculator Android app using the Android Studio. This post can be very helpful for beginners because in the post we will covering basic components which is helpful for beginners. We will use Android Studio to developing an android app, it is easy to use (and free) development environment. If you don’t have android studio then must read Install & Setup Android Studio Java JDK & SDK

Page Contents
Essential Skills Requirements for Beginner Level
1. JAVA
Java is the language that underpins all Android development. Mostly Java programming languages are wont to build Android apps. If you would like to use java tools So we’ve to put in JDK. What is JDK? JDK is the Java Development Kit.
2. UNDERSTANDING OF XML
In the Android world, developers use XML to make layouts that function the foundational UI definition for Android applications. the basics of XML is a crucial skill for Android developers.
3. ANDROID SDK
SDK stands for Software Development Kit. The Android SDK is the module of Java code that gives developers access to devise functions just like the camera and accelerometer & many more. One key component of the Android SDK may be a library called Gradle.
4. ANDROID STUDIO
Android studio is an IDE. What is IDE? IDE is an integrated development environment. In simple words, this is a tool that gives us an environment to create an Android app.
Android Studio helps make auto-complete suggestions as you type, your code to identify the source of errors. CPU monitors, helping developers confirm their code will maintain high performance on a mobile device. Android Studio is a must-have for Android developers.
Essential Skills Requirements for Intermediate Level
5. APIS
As an Android developer, you’ll interact with many other services. For example, you may want to allow your users to access a calendar from third-party service or check the stock market.
Many companies offer APIs and can tell you exactly the way to query them for data in a consistent, secure way. Google also makes it very easy to attach to their own APIs from your Android app. For example, you’ll easily use Google APIs to watch the situation of your users.
6. DATABASES
The database is important if you want to let users use the app when they’re offline. Another way to store data locally is through Android’s built-in support for using SQL to interact with an SQLite database. However, you select to handle data in your application.
7. MATERIAL DESIGN
Material Design was released by Google for interface guidelines and standards. Material Design for a way to layer various elements on the screen and use specific styles like drop shadows.
You’ve probably seen Material Design in the real world if you’ve used the new Google Drive app or the new Inbox by Gmail application on mobile.
Google recommends that Android developers use these guidelines as a foundation for his or her own user interfaces. The documentation online provides an excellent foundational understanding of fabric Design principles.
Let’s get started to make a Simple Calculator android app
Simple Calculator App
Step 1: Start Android Studio and Open a New Project
- Open Android Studio.
- Click the Quick Start menu, select Start new Android Studio project.
- Create a New Project window that opens.
- Set the company name as desired.
- Then select the project file location is and change it if desired.
- Click “Next.”
- Select Phone and Tablet.
- Click “Next.”
- Select Empty Activity.
- Click Next.
- Click “Finish.
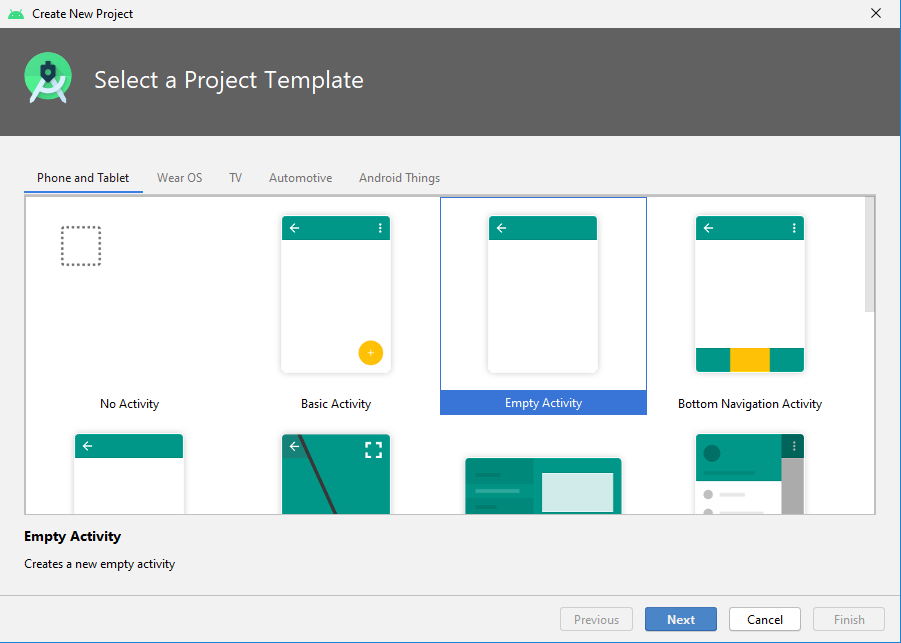

Step 2: Delete by default created the Welcome Message in the Main Activity
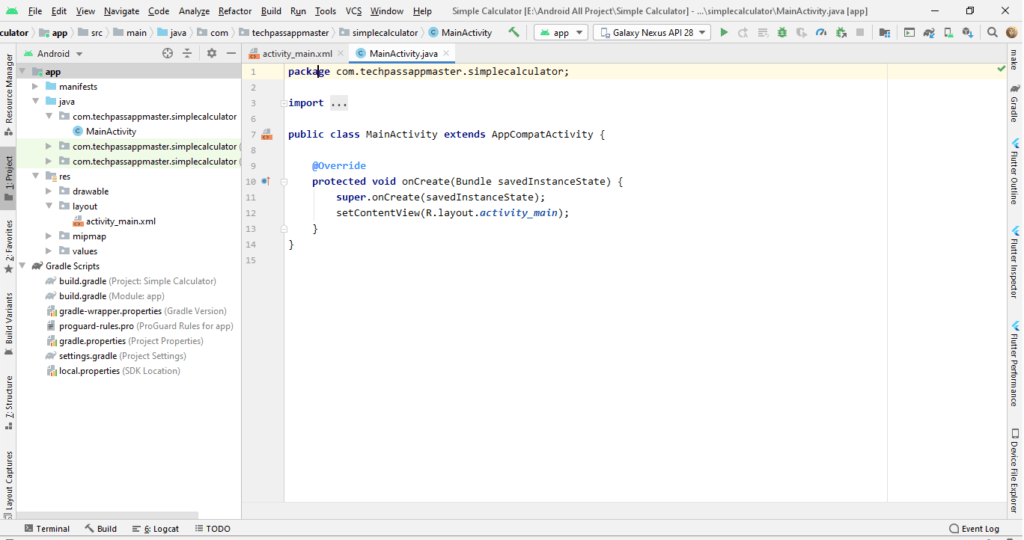
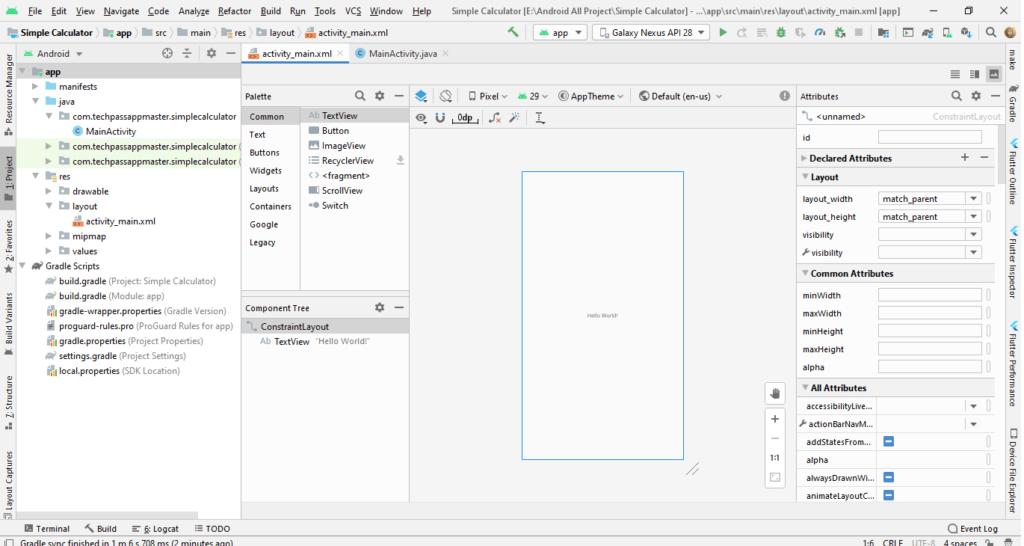
Step 3: Open res -> layout -> activity_main.xml (or) main.xml. Here we are going to create the application interface (UI).
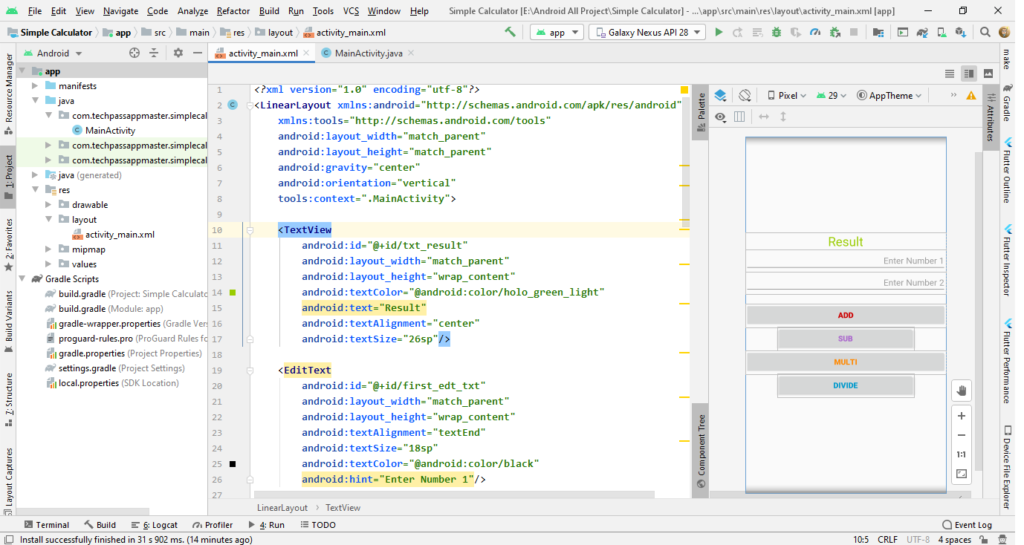
Write XML Code for the application interface (UI).
<?xml version="1.0" encoding="utf-8"?>
<LinearLayout xmlns:android="http://schemas.android.com/apk/res/android"
    xmlns:tools="http://schemas.android.com/tools"
    android:layout_width="match_parent"
    android:layout_height="match_parent"
    android:gravity="center"
    android:orientation="vertical"
    tools:context=".MainActivity">

    <TextView
        android:id="@+id/txt_result"
        android:layout_width="match_parent"
        android:layout_height="wrap_content"
        android:textColor="@android:color/holo_green_light"
        android:text="Result"
        android:textAlignment="center"
        android:textSize="26sp"/>

    <EditText
        android:id="@+id/first_edt_txt"
        android:layout_width="match_parent"
        android:layout_height="wrap_content"
        android:textAlignment="textEnd"
        android:textSize="18sp"
        android:textColor="@android:color/black"
        android:hint="Enter Number 1"/>

    <EditText
        android:id="@+id/second_edt_txt"
        android:layout_width="match_parent"
        android:layout_height="wrap_content"
        android:textAlignment="textEnd"
        android:textSize="18sp"
        android:textColor="@android:color/black"
        android:hint="Enter Number 2"/>

    <Button
        android:id="@+id/btn_add"
        android:layout_width="match_parent"
        android:layout_height="wrap_content"
        android:text="Add"
        android:layout_marginTop="20dp"
        android:textColor="@android:color/holo_red_dark"
        android:textSize="16sp"
        android:textStyle="bold" />

    <Button
        android:id="@+id/btn_sub"
        android:layout_width="280dp"
        android:layout_height="wrap_content"
        android:text="Sub"
        android:textColor="@android:color/holo_purple"
        android:textSize="16sp"
        android:textStyle="bold" />

    <Button
        android:id="@+id/btn_multi"
        android:layout_width="match_parent"
        android:layout_height="wrap_content"
        android:text="Multi"
        android:textColor="@android:color/holo_orange_dark"
        android:textSize="16sp"
        android:textStyle="bold" />

    <Button
        android:id="@+id/btn_divide"
        android:layout_width="280dp"
        android:layout_height="wrap_content"
        android:text="Divide"
        android:textColor="@android:color/holo_blue_dark"
        android:textSize="16sp"
        android:textStyle="bold" />

</LinearLayout>
Step 4: Open src -> package -> MainActivity.java. The interface part of the application is done, let’s focus on adding functionality to the application. Write the JAVA Code.
package com.techpassappmaster.simplecalculator;

import android.os.Bundle;
import android.view.View;
import android.widget.Button;
import android.widget.EditText;
import android.widget.TextView;
import androidx.appcompat.app.AppCompatActivity;

public class MainActivity extends AppCompatActivity {

    EditText first_no,second_no;
    TextView txt_result;
    Button add, sub, multi, divide;
    int first,second;
    float result_divide;

    @Override
    protected void onCreate(Bundle savedInstanceState) {
        super.onCreate(savedInstanceState);
        setContentView(R.layout.activity_main);

//        Connect xlm view to java by findviewbyid

//        EditText
        first_no = findViewById(R.id.first_edt_txt);
        second_no = findViewById(R.id.second_edt_txt);

//        TextView
        txt_result = findViewById(R.id.txt_result);

//        button
        add = findViewById(R.id.btn_add);
        sub = findViewById(R.id.btn_sub);
        multi = findViewById(R.id.btn_multi);
        divide = findViewById(R.id.btn_divide);

//        Now set click listen on view for click event

        //        for adding two number
        add.setOnClickListener(new View.OnClickListener() {
            @Override
            public void onClick(View v) {

                first=Integer.parseInt(first_no.getText().toString());
                second=Integer.parseInt(second_no.getText().toString());

                txt_result.setText(String.valueOf(first+second));

            }
        });


        //        for subtraction two number
        sub.setOnClickListener(new View.OnClickListener() {
            @Override
            public void onClick(View v) {

                first=Integer.parseInt(first_no.getText().toString());
                second=Integer.parseInt(second_no.getText().toString());

                txt_result.setText(String.valueOf(first-second));

            }
        });

        //        for Multiplication two number
        multi.setOnClickListener(new View.OnClickListener() {
            @Override
            public void onClick(View v) {

                first=Integer.parseInt(first_no.getText().toString());
                second=Integer.parseInt(second_no.getText().toString());

                txt_result.setText(String.valueOf(first*second));

            }
        });

        //        for Divide two number
        divide.setOnClickListener(new View.OnClickListener() {
            @Override
            public void onClick(View v) {

                first=Integer.parseInt(first_no.getText().toString());
                second=Integer.parseInt(second_no.getText().toString());

                result_divide =first / second;
                txt_result.setText(String.valueOf(result_divide));

            }
        });
    }
}
Step 5: Run & Test Application on the device.
Must Read:-
- Install & Setup Android Studio, Java JDK & SDK.
- How To Add Google Play Services To Android Studio Project.
- Top 5 Things To Avoid While Developing Android Apps.
- How To Make An Android App For Beginners
Congrats! You’ve now completed your first Android application with some basic functionality.
From here you have the cursory knowledge you need to go on to learn all there is to know about Android application development.

I am glad to be a visitor of this arrant site! , thankyou for this rare information! .
Thank u ☺
Heya i am for the first time here. I found this board and I find It
really helpful & it helped me out much. I am
hoping to give one thing back and help others such as you helped me.
Can you tell us more about this? I’d care
to find out some additional information.
Great article! That is the type of info that are supposed to be shared around the
net. Disgrace on Google for now not positioning this post higher!
Come on over and consult with my site . Thanks =)
I like it whenever people come together and share views.
Great blog, continue the good work!
Great info. Lucky me I came across your website by chance (stumbleupon).
I’ve bookmarked it for later!